Monday, October 17, 2016

Flow: Fluid Consumption Balancer

A client had a problem about his company's consumption of a fluid.  This particular fluid is the essential for operations, so he got two suppliers for redundancy.  However, the two suppliers sell the fluid at different prices where the difference is at least 20% depending on the market.  Operationally, the lower priced supplier is the priority, but fluid from the more expensive one should still be consumed due to minimum purchase contract obligations.

First, they got the average total consumption of this fluid for the whole company.  They were able to determine that to achieve minimum consumption of the more expensive supplier's fluid, a ratio of 3:1 is comfortable to avoid penalties.

Before they commissioned the project, what the client did was to shift from one supplier to the other by manually closing, and opening valves from the suppliers' respective tanks.  This was done every other week.  In a month, that roughly translates to a 1:1 ratio (half from supplier A, other half from B).  However, this scheme does not maximize savings, because consumption from the more expensive supplier is way above minimum.

The client then commissioned the project to rebalance their fluid consumption favoring the cheaper supplier.  The solution was to find a way to monitor the fluid consumption per supplier.  Then, when a condition is met (3:1), one supplier's line is cut off, and the other one opened.  Of course, some form of intelligence is required by this setup.

What we did was to attach a flow meter, and a solenoid valve to each of the fluid lines.

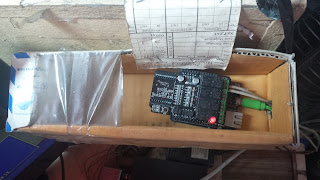
The flow meter counts how much fluid is consumed, while the solenoid valve opens, or closes the line.  The flow meter solenoid valve combinations are wired to a microcontroller, in our case a Bluno, which is just an Arduino with built in bluetooth low energy.

The flow meters directly interface with the microcontroller, while the solenoid valves are connected to a single channel relay with the normally opened/closed port controlled by the microcontroller.


The firmware is very simple.  The microcontroller determines how much fluid from the cheaper supplier passes through.  When it senses that 30 liters from the cheaper supplier have passed, it shuts down the flow by closing the solenoid valve.  Shutting down the solenoid valve of the cheaper supplier is as simple as switching the relay to enable the normally opened port (expensive supplier's) instead of the normally closed (cheaper supplier's) port.  The more expensive supplier's solenoid valve opens, fluid flows, and is measured again by its own flow meter.  When 10 liters have passed, the microcontroller switches consumption back to the cheaper supplier's by opening its valve, and closing the other one.  The whole process is repeated.  So for every 30 liters consumed from the cheaper supplier, 10 liters is used from the more expensive one.

The setup itself has no way to show the user the status of the fluid lines (consumption, current line in use), because we thought that adding a LCD screen will complicate the apparatus, and we were targeting minimum cost.  What we did to show the status was to connect the microcontroller to an Android phone via bluetooth, and with an app (Flow), show consumption, and the currently used line, both in real time.  A second by second log entry, which contains time, consumption from both lines, and status is created every time the app connects to the apparatus, and this is written to a file in the Android phone.  The app also has a reset feature that sets consumption of both lines back to zero when billing is likewise reset.


The only limitation of this apparatus is the accuracy of the flow meters.  According to the supplier of the meters, they have an error of 3%, give or take.  Fortunately, the customer tolerates the flow meters' margin of error, which in our test shows that it is usually in his favor.  Since the apparatus is electronic, and it is setup to operate outdoors, it requires protection from the elements, so the electronic components are housed in a wooden case, and it is plastic wrapped for added protection.  The front of this setup is actually covered.

The client can now be assured that his consumption maximizes savings from the low priced supplier without human intervention.  Through the log file, he can monitor the company's fluid consumption, which can then be cross checked with the suppliers' bills.  And before he leaves the office, he can see if any of the fluid lines were left open, and take appropriate action.

Thursday, June 16, 2016

Cleverdog FAQs

1.  Does Cleverdog require the owner to register a domain name?
No.  The Cleverdog app is the only requirement to view video from the cameras.  The system is peer to peer, so the device connects directly to the camera without a "middleman".

2.  Does Cleverdog store video in the cloud?
No.  It stores video in its microSD card.  7 days worth of video fits into a 32GB capacity card, which is also the maximum capacity it accepts.  When the memory card is full, the camera overwrites old video.  For some people this is a lack in features, but others don't mind.  We have spoken to a shopkeeper in Hongkong, who uses a rival product that connects to the cloud to access the camera, and to playback video.  According to the him, the product is always at the mercy of the company that maintains the servers.  Often, the server is down.

3.  Can Cleverdog work without a microSD card?
Yes, but video cannot be recorded.  You may be able to stream real time video, but it will not be stored.

4.  Can Cleverdog work without an internet connection?
No.  This stumped us as well.  Cleverdog does not record video if there is no internet connection.

5.  Is Cleverdog like a CCTV camera, which should be mounted on walls, or ceilings?
Yes, and no.  It can be screwed on to a wall, or ceiling using the supplied tox, and screws.  Its mount has four mounting points.  It may also be placed on a flat horizontal surface, like a table.  Its mounting is not necessarily fixed.  What is important though, and this is where some clients have an issue with, is electrical power.  Wherever you mount it must have a  power source (110V/220V, USB).  Some clients are over eager to place their Cleverdog cameras at their strategic positions forgetting that it needs to be within reach of a power source.
Cleverdog package (includes USB cable, optional 32GB microSD card (P550), and USB power source (P100) sold separately)
6.  So how is Cleverdog powered?
You have two options.  You may plug it to an electrical outlet using a USB charger (not included), or you may place it near a device that has USB power (500mA).  We tested powering one using a modem's USB port, and using a powerbank.

7.  Can the videos be saved somewhere else, like a desktop?
Yes.  You may download the Cleverdog Windows app on the Cylan Cleverdog website to do this.  There is an "Export Video" options in its menu.   Sorry Mac users (like us), the developers only made a Windows version.

8.  Besides I, can anyone else use the Cleverdog camera?
Yes, you may share the use of a camera to another user, who also has a Cleverdog app.  For example, I am the main user of three cameras, one of which is at the office.  I can share that camera to my partner's Cleverdog account, so he can view the office as well.  What we cannot do though is to view the same camera at the same time, because there is no central server.

Sunday, June 12, 2016

Cleverdog: Low Cost CCTV Replacement Solution (Part 2)

One solution is the use of a wireless range extender.  But not a run off the mill range extender.  The project required a powerful outdoor type (27 dBm transmission power) to cover the whole plant in any weather condition.  I decided to shop around, and found that the best range extender for the client is TP Link's TL WA7210N, due to its compatibility with the client's current wireless router, which I would find out later on is irrelevant.  Since this was the first time we were going to cover an area this large, and the fact that I have no track record in using a range extender, I begged for time to finish the project.

Initially, to keep the setup simple, I wirelessly connected the main router to the range extender with the main router sitting behind a wall on the second floor office, and the range extender standing downstairs 2 meters off the ground, and around 30 meters away, no line of sight due to the wall.
Option 1:Range Extender mode 30 meters away without line of sight due to wall (pink Cleverdog is our sample unit)
However, we noticed that devices were having a hard time connecting to the range extender only after a few hours.  The devices connecting to the range extender were not being given IP addresses.  The workaround to the problem was to have someone just unplug/replug the range extender when this issue occurred.  However, this is an unacceptable solution.  Fortunately, I was able to recreate the problem with approximate conditions at home using a TP Link TL WR841N as a main router, and an old TP Link TL WR740N configured as a range extender.  At home, I was able to concentrate in finding a solution than I would have been at the client's plant.

The problem, apparently, was that the range extender itself was getting disconnected from the main router, because the signal it received was too weak given their placements.  The range extender required nearly full signal strength from the main router for it to work reliably.  Two out of four bars will not do.  A constant three to four bars (signal percent 80%, @RSSI range of 30 should be above 15dBm) of main router signal was required to avoid disconnection from the main router.

Upon consultation with the client, we decided to experiment with a wired setup with the range extender acting as an access point connected to the main router.  The experiment proved to offer a reliable connection, but since a short network cable was used, and the access point was placed just at an office window, the coverage was dismal.  Cleverdog cameras at the far end of locations #3, and #4 were not able to connect.  But the experiment showed that if the placement of the wired access point was improved, robust coverage can be achieved.  The next challenge was to select the best location of the access point.

A truss supporting roofing on an i beam post 17 meters away from the main router was selected.
Option 2:  Wired access point mode
The next challenge was wiring the access point from this location to the main router.  Luckily, the ceiling where the main router is situated has overhangs installed for the legacy security camera wires.  These overhangs were used to route the cable from the main router to the access point.  Total network cable length was 24 meters, which is well below the 100 meter limit for Cat5E.
24 meters cabling
Special mention to cabling practice must be mentioned here: color sequence as prescribed by T568A Straight Through Ethernet Cable must be strictly followed.  I had the displeasure of debugging unstable connection for a considerable amount of time, because I followed my own color sequence.  My theory is that since the Cat5E cable I used was unshielded, and more than 5 meters long, interwire noise becomes a critical factor in establishing connection.  I followed my own convention in the experimental stage, and it worked, but that instance used a shorter cable, in which noise would not have been an issue.  Another thing to note was our commitment to stick to a wired solution.  The distance of the access point's placement from the main router (17 meters) was half compared to its former location when it was a range extender (30 meters).  At this distance, I think a wireless solution (range extender) would be simpler, since no cabling is required.  However, we stuck with the wired access point option as we deemed it to be more robust, and reliable.  Should the range extender option fail again, it is absolutely unacceptable for the client's staff to climb up 15 meters to the device just to reboot it.
Access Point mount (rear)

Access Point mount (front, zoomed)
After fixing that problem, connection was established, and Cleverdog IP cameras went online.  The client can now monitor his business 24/7, and as an added bonus, the whole plant is now wifi enabled.  Another inventory tracking project commissioned by the client that requires connection of Android phones to a central server in his office is facilitated by this improvement in the plant's IT infrastructure.

Postscript:

In retrospect, I could have ordered a higher spec wireless access point rather than TP Link's TL WA7210N.  I ordered this model, because I thought its compatibility with the client’s router would be an important requirement.  However, we went for a wired solution, so its wireless compatibility with the main router (2.4GHz, 150Mbps) became irrelevant.  I should have chosen a 5GHz, 300Mbps model instead.

The client's two legacy 16 channel CCTV camera systems cost roughly P176,400.
DVR with 500GB HDD P25,000
16 CCTV cameras P1,450 x 16 = P23,200
Installation for a 1 ha. plant (transportation, labor, cable, equipment) P40,000
Total P88,200 each

The same number of Cleverdog IP cameras costs:
Cleverdog IP camera P1,700 x 32 = P54,400
Outdoor Wireless Access Point P4,000 (from PC Options)
MicroSD card  P500 x 32 = P16,000 (optional)
Installation P0 (client had his own maintenance staff set up the cables)
Total P74,400 excluding internet related costs (subscription, router), and cabling
Client's total device package excluding cabling, which he provided
Both systems have their innate advantages, and disadvantages, so it is up to the user to decide whether the trade offs justify the cost.  The two approaches are not mutually exclusive as proven by our client having both systems with fewer Cleverdog cameras than legacy ones, but placed in critical areas where he prefers on demand monitoring.

Cleverdog: Low Cost CCTV Replacement Solution (Part 1)

A client of my wife commissioned us to install Cleverdog wireless IP cameras around their manufacturing plant.  They decided to go wireless for many reasons.  The existing wired security camera setup was too expensive to maintain.  Since they are located north of Manila, repair costs P1,500 per visit whether there is only one camera to fix, or more.  Second, rats were chewing on the wires.  Unfortunately, the camera wires the rats chewed off were the ones in the plant's fringe, so the supplier was charging them upwards of P60,000 for rewires.  Another reason was the cameras used were getting obsolete (PAL video system), so replacements were hard to come by.  They were also lagging behind the real time monitoring features of current generation IP cameras, since their current system requires a large bandwidth that cannot be supported by their wireless internet connection (Globe Tatoo).

Although most of the legacy system's cameras were still working, the client wanted to augment it with Cleverdog IP cameras, so he can monitor his plant at any time of the day, since the plant has a night shift.

The nice thing about Cleverdog cameras is that they are very easy to setup.  As long as there is a decent internet connection, installation is a breeze with the app available on iOS, and Android.  Once set up, streaming video from Cleverdog does not require a large bandwidth, so it is perfect for our client's slow internet connection.  Others may argue that the video quality may not be HD, but for our client's use, video quality was enough, meaning he was able to recognize the persons on the video (one of the things he was after was to catch people smoking in the plant premises).  A couple of features also made Cleverdog attractive to our client besides the basic feature of recording.  The camera has a night mode, which illuminates the scene with infrared light, and this automatically kicks in whenever the camera detects low light.  It also has a motion detect feature that notifies the owner whenever movement is detected.  The only downside is that it only accepts up to 32GB microSD, so continuous video recording is only up to seven days.  The client did not mind, since for their use, when interesting incidents happen, they are reported within the hour, so having seven days of stored video is already too much.

It was apparent that what he was after was the real time monitoring of his business anywhere, anytime.

The client ordered a trial run of six Cleverdog units to be placed in strategic locations around the plant:
1.  1 camera for the security guard (the guard on duty often sleeps on duty)
2.  1 camera at the driveway (for him to see how many delivery trucks are present)
3.  2 cameras at the production area where there is a high risk of people smoking or slacking off
4.  2 cameras at another production area to monitor people on the evening shift

The challenge was that the plant sits on a one hectare lot, and the areas he wanted to cover were spread out into 4 separate locations that an off the shelf wifi router would not be able to cover entirely.  The security guard, and driveway cameras can connect to the router at the office, but the other two locations are too far from the office.  Location #3 was 95 meters from the office, while location #4 is 110 meters away.  The problem would have been simpler if there was a clear line of sight from the office to these areas, so the wifi signal would have no obstacles in reaching the cameras, but there were structures built in between that degrades communications between the router, and the cameras.

(continued on part 2)

Wednesday, June 8, 2016

Arduino Recess Alarm Bell

We have to remind our employees that break time is over, else they extend their recess.  Most of them do not wear wrist watches, and we do not have a clock hung on the common area's wall, so I did not blame them if they still hung around even when break time is through.  The time keeper then was our guard, who carried a metal pipe, and who would repeatedly hit the stair's hand rails to signal the start, or end of break time.

It was obvious that sounding the alarm can be done in a better way.

Fortunately, there was an Arduino Yun, and a relay shield lying around at home (bought way back 2013, but just saw action in a wireless light switch, a motion sensed photo recorder, and a remote temperature sensor).  For the hardware, a few things are needed, the Arduino Yun microcontroller, its relay shield, the bell, and electrical wires.

The design is very simple, the relay shield is attached to the microcontroller.  The trickiest part maybe is attaching the electrical wire to one of the relays.  What I did was to split one of the supply wires, and attach one end to the relay's normally open (NO) port, and the other to the common (COM) port.  The Arduino Yun should also be powered, so the micro USB cable does the job.


The design could be improved by using a single package relay, rather than a relay shield, which renders three relays unused.

The code is quite simple as well.  Here's the code with annotations:

#include <Process.h>

#define PIN_ALARM 13 //pin 13 controls relay switching
#define PIN_DEBUG 9  //pin 9 is the LED output pin to know the sketch is working
#define DELAY_GENERIC 1000 //1 second delay
#define DURATION_ALARM 1000*3 //alarm duration
#define DELAY_ALARM 1000L*60L //delay after sounding the bell "L" is for "long" data type

Process date;

int hours, minutes, seconds;

void setup() {
  pinMode(PIN_ALARM, OUTPUT);
  pinMode(PIN_DEBUG, OUTPUT);
  
  Bridge.begin(); //the bridge is needed to retrieve the time from Linio (embedded Linux)
}

void loop() {
  
  digitalWrite(PIN_DEBUG, HIGH); //turn on the debug LED

  //request the date/time from Linio
  date.begin("date");
  date.addParameter("+%T");
  date.run();
    
  if (date.available() > 0) {
    digitalWrite(PIN_DEBUG, LOW); //turn off the debug LED

    //parse the time start
    String timeString = date.readString();
  
    date.flush();
    
    int firstColon = timeString.indexOf(":");
    int secondColon = timeString.lastIndexOf(":");
    
    String hourString = timeString.substring(0, firstColon);
    String minString = timeString.substring(firstColon + 1, secondColon);
    String secString = timeString.substring(secondColon + 1);
      
    hours = hourString.toInt();
    minutes = minString.toInt();
    seconds = secString.toInt();
    //parse the time end

    //test time for debugging
    //if ((hours == 12) && (minutes == 3)) alarm();

    //alarm times
    //notice that alarm times are individual if statements
    //I could've made it one if else block, but
    //for some reason the microprocessor hung up when the times are in
    //an if else block
    if ((hours == 6) && (minutes == 0)) alarm();
    if ((hours == 7) && (minutes == 0)) alarm();
    if ((hours == 10) && (minutes == 0)) alarm();
    if ((hours == 10) && (minutes == 15)) alarm();
    if ((hours == 10) && (minutes == 30)) alarm();
    if ((hours == 12) && (minutes == 0)) alarm();
    if ((hours == 13) && (minutes == 0)) alarm();
    if ((hours == 14) && (minutes == 0)) alarm();
    if ((hours == 15) && (minutes == 0)) alarm();
    if ((hours == 15) && (minutes == 15)) alarm();
    if ((hours == 15) && (minutes == 30)) alarm();
    if ((hours == 18) && (minutes == 0)) alarm();
    if ((hours == 19) && (minutes == 0)) alarm();
  }

  //1 sec. delay for every loop run for reliability
  //I observed that the microprocessor hung up without this delay
  //1 second inaccuracy (i.e. the bell rings at say 12:00:01 instead of 12:00:00) is ok for us
  delay(DELAY_GENERIC);
}

void alarm() {
  //close the relay...
  digitalWrite(PIN_ALARM, HIGH);
  //...for 3 seconds
  delay(DURATION_ALARM);
  //open the relay
  digitalWrite(PIN_ALARM, LOW);
  //delay for a minute (for reliability as well, like the 1 sec. delay for every loop)
  delay(DELAY_ALARM);
}

When the setup is plugged, the microcontroller syncs its system time with the router, which gets its time from the Internet.  Then the bell briefly rings as part of the Yun's initialization procedure.  After another brief period, the debug LED starts blinking.  This signifies the sketch is running.  The bell rings on the specified times, give a few seconds.

I'm an engineer, not an artists, so pardon the "case", and its mounting.  Nothing special about the bell's mounting, which is away from the microprocessor to avoid excessive vibration, and electrical interference.


So now, the guard does not have to make a very unpleasant manual alarm everytime break starts, or ends.  We have a school bell that takes care of that.

Wednesday, April 27, 2016

Jen: Location Data Visualizer

Get it on Google Play

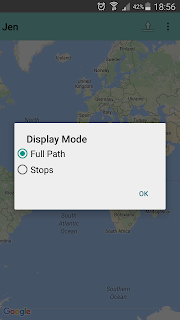
Jen was created as a helper app to the GPS tracker app, Loc.  Given the data log created by Loc, Jen shows these locations on Google maps.  Two settings are available.  The user may choose to display all points in the map, or the user may opt to just display points where the tracking device stayed for a minimum number of minutes.

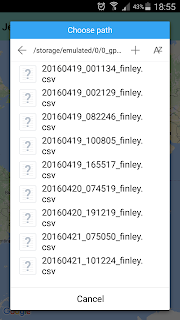
Being a helper app, Jen is very easy to use.  Just tap on the upload icon at the upper right corner next to the menu icon (three vertical dots), and the app calls the device's file manager (e.g. ES File explorer), where you choose the source file as basis for the markers.


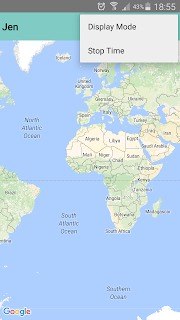
Once chosen, Jen displays the markers on Google map.  You may choose the setting whether to display the whole path, or just stops at the menu options.  Setting of minimum stationary time can also be found in the menu settings.


As an example, when I input the file of our trip to Ilocos, Jen displays the path we took.

Tapping a marker shows the time stamp, and speed at the selected point.  Zooming in also shows path lines (in blue).


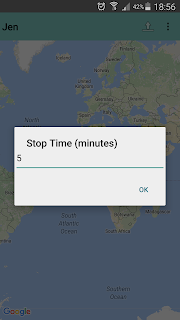
For long trips, this can be quite complicated to analyze, especially when Loc is set to continuous mode (i.e. data points are logged every second), to simplify viewing, stop mode may be used to display markers where in this case, we stayed in a location for a minimum of five minutes.


Tapping on each marker shows the start time, and duration the device stayed at the point of interest.

Monday, February 1, 2016

Loc: Our Low Cost, In House GPS Tracker

We have a small logistics department, which delivers our products to customers, which come in a variety:  some are within MM, and GMA, but a few ones are in the northern, and southern parts of the island.  We have understanding customers, but there are a handful, who are demanding, especially with delivery schedule.

We also have a variety of personalities in our logistics department.  Most are rule abiding employees, but some, as I heard from a source, bring their assigned truck to a place where they sell the truck’s diesel, or tires.  I also recently had problems with delivery people coming back late due to one reason or another (e.g. truck ban), and thus having a suspiciously large overtime.

Problems with customers located at remote areas, customers blowing off their tops over delivery time, and belligerent delivery staff, are not new in the logistics business, so people have been making solutions.  One of them is installing GPS trackers.  While installing a GPS tracker is not a cure all, as it will not prevent pilferage as one owner of a trucking company advised us, installing one is at least a deterrent.

There are 2 types of GPS trackers.  One is stand alone, in which you just buy a device, and whenever you SMS it with a message, it replies with a location.  Reliable looking devices cost around P2700 up.    The other is subscription based, in which you log on to a site with a map that tells you where the delivery vehicle is, in real time.  However, this comes with a price of P900 to P1000 per month, which may or may not include the price of the GPS device, and its installation.  Subscription based services offer other features like remote engine cut off, fuel monitoring, live feed, and voice communications.

Subscription based services, for me, are the gold standard in GPS tracking, but I thought that it was too pricey for an SME like ours, which does not carry high value items like food, grocery items, and new appliances.  Trucking for multinationals won’t mind signing up for the service, because they usually carry high value goods, and this is just a small investment to protect the assets.  And besides, their revenue more than covers the subscription fee.  However, small companies like us must be careful in monitoring our expenses, because the profit we get from delivery of low value goods is so small that any additional expenses render a trip to just break even, or even a loss.  Any expense must be calculated to bring real value.

So to partially solve our problems, the stand alone GPS tracker option seemed to be a good fit.  However, during that time, I was starting my training in Android app development, and these issues became a spring board to develop our own GPS tracker (see http://crazyhappymonkey.blogspot.com/2015/07/gps-tracking-android-app-loc.html).  Development took 2 months starting with my Android training in March, ending in May after all features were debugged.  Development cost in the point of view of the company was zero, since I waived the extra, out of office work.  The only expense was buying Android phones for each driver.  We chose the Cherry Mobile Marble priced at P2500.  Since the app’s deployment, it has proven to be reliable in terms of battery life, and GPS signal reception.

The app is real time tracking capable, but it will consume mobile data, which I was trying to avoid in the first place.  I thought that given the new capability, we would be tracking the vehicle frequently, but that was not the case.

For our company, the reality is, use of GPS tracking is very limited.  Budget for office staff is very scarce, so we live by having a single person carry out the functions of a department.  And this is why, we cannot afford to have one dedicated person monitor the movements of our deliveries.  So how do we use the app?  At the end of each day, I have a person assigned to turn off the phones.

The following day, the guard on duty is instructed to turn on the phone of each truck about to leave.  The app is set to run at boot up, so tracking starts as soon as the phone is booted on.  The primary use of the app is in sending the latest vehicle location to irate, demanding customers.  From our experience with using Loc, irate customers are faster to calm down when we forward to them Loc’s SMS reply, instead of just telling them where the vehicle currently is, and the ETA.  I think customers are more inclined to believe GPS data, and thus judge the ETA, freeing us from making commitments.

There are times when we have to deliver to clients in remote areas.  Logistical challenges arise when delivery vehicles malfunction on the road, more so when they are in far flung areas.  Just last December, one of our vehicles had an injection pump malfunction on the way home from down south.  The vehicle stopped along the national highway between towns, so landmarks were hard to determine (i.e. farm lands).  We had to interrupt the Christmas party of the repair company, who obliged to send two of their mechanics to fix our vehicle on the condition that we send one of our staff to accompany them to the site.  Unfortunately, our staff were already on vacation.  Some trouble, and compensation were saved by using Loc instead to determine the vehicle’s location.  It was accurate, so the mechanics were able to save time looking for the vehicle.  We had to pay a considerable amount of overtime to the logistics staff, but it could have been worse if the mechanics had difficulty locating the site.

The last use of this app is for staff delinquency detection.  I made an app (http://crazyhappymonkey.blogspot.com/2016/04/jen-location-data-visualizer.html) that, given the GPS tracking file, determines the places where the delivery trucks stayed more than a defined amount of time, which in our company is 5 minutes.  So if the staff stayed in a location for more than 5 minutes, the app tags that place as a point of interest.  So knowing the places where they stayed gives me a story about what the vehicle did for the day, to help me see if they made some unexpected stops.  This is done everyday for each truck.

Loc works for us.  We run on a shoestring budget, so we forgo sophisticated features found in other providers that we foresee won’t be heavily used anyway.  We simply need to know where the vehicle is to report to a customer, find it for repairs, or for our peace of mind.  Compared to subscription based trackers, Loc cannot compete feature wise, but then again, what Loc does is just what we need, so it gives the best value for the development effort, and the little money we spent.

Sunday, January 31, 2016

Bundy Clock App: Mila

We are using a finger print scanner coupled with an RF card for good measure in keeping track of our employees' attendance.  Their time records are downloaded from the scanners using the devices' software.  The file is an easy to use spreadsheet that can be processed for our purposes by a small program.

The problem with this set up is the RF card, which some employees don't bother to return, when they don't bother showing up to work anymore.  Each RF card costs P20, and the scrooge in me throws a tantrum everytime an employee decides to go AWOL with the card.  The scrooge feels worse for the unreturned card than the employee not reporting to work.  Weird.

Regular employees can decide to just go AWOL like they were just cancelling a scheduled dinner, so much so new, probationary employees, who virtually have no commitment whatsoever to the company just yet, since they're still on probation.  So it has become my practice not to use the finger scanning device for their attendance just yet as well, because the RF cards are my precious.

Previous practice was they used a time card for their records.  However, there was a time we had 20 new employees.  And encoding the times for 20 people is not pleasant work for the person typing all that, the same person who has other things to do.

So I wrote Mila, named after my MBA economics professor.

Mila is a bundy clock Android app that reads an employee's NFC, and records his/her time in a CSV file.  The app also includes a registration function, which writes employee information in an NFC card for identification when the card is tapped on to the device.

Everyday, I just download the CSV file to know if a new employee is present or absent.  At the end of the week, the attendance file is passed to a program that computes the payroll.  The staff is freed from manual transfer of time card data to the computer, which enables the staff to do other value added activities.

And to solve the problem of employees not giving back the card in case they go AWOL, I don't let them bring the NFC cards home.  Just like time cards, the NFC cards are left on the desk of the security guard, so they only use it when they need it.  And the phone that has Mila in it is managed by the guard, who personally taps the NFC on the phone to ensure that the NFC card is indeed assigned to the person.

To register an NFC card to an employee, tap the "Add Contact" icon on the upper right.

The "Add Employee" screen appears.  Fill up the information required, and tap the NFC card close to the device.  A message will appear when registration is successful.


To record time in or out, tap the button (Clock In, Clock Out) of the applicable time status.  Then tap the NFC card close to the device.  The employee record appears on the main screen, and his/her time record is written to the CSV file log.csv.

log.csv can be viewed at internal memory's 3_mila directory.


Get it on Google Play

Tuesday, January 26, 2016

Automated Weight Recording: Timbang Instructions

Before using Timbang, two files are required:

1.  scrap.csv This is a CSV file that contains the list of items to be weighed.  Each line of the file must contain the item name:

<item_name>

For example, a business that is involved with meat products may contain the following lines in its scrap.csv file:

beef brisket
beef rib
beef short loin
beef sirloin
beef tenderloin
pork bacon
pork belly
pork chops

2.  supplier.csv This is a CSV file that contains the supplier list.  Each line of the file must contain the following:

<supplier_name>

Again, as an example of a business involved in meat products, the file may contain the following lines:

Century
CDO
King Sue
Purefoods

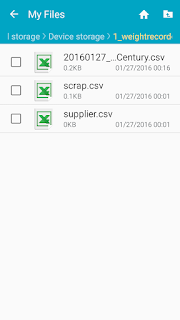
Open Timbang for the first time creates a directory "1_weightrecorder" in the device’s internal storage.

Copy the CSV files in 1_weightrecorder.

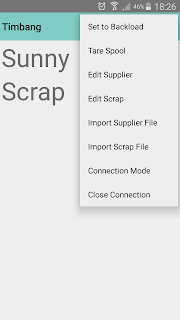
Tapping the three vertical dots on the upper right corner of the screen reveals the menu.  Tap "Import Supplier File", and "Import Scrap File".  The CSV files are loaded into the app's internal storage.  After doing this, you may delete the CSV files.

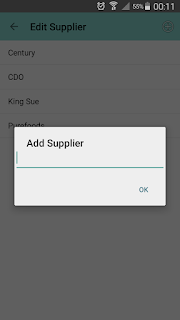
As a company goes along, suppliers, and items may change.  You may edit suppliers by opening the menu, and tapping "Edit Supplier".  A list of supplier names appears.  To add a supplier, tap the plus icon on the upper right of the screen, and the "Add Supplier" dialog appears.  Fill up the name fields, and press "OK".


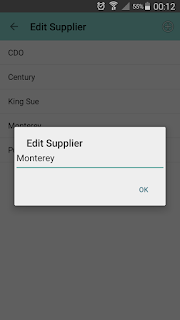
To change a supplier's name, long press the supplier entry in the "Edit Supplier" screen to show a context menu with "Edit", and "Delete".  Tap "Edit" to show the "Edit Supplier" dialog, which is similar to "Add Supplier" dialog.  Edit the name, and press "OK".  The supplier entry is updated.


You may also delete suppliers by long pressing the supplier entry, and selecting "Delete".

Editing item entries is similar to editing suppliers.  You may start editing items by selecting "Edit Scrap" at the menu of the main screen, and following similar steps as editing suppliers.

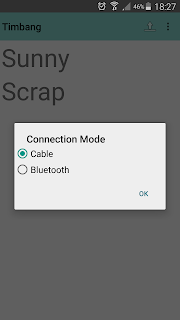
Select the connection type by tapping the menu icon, and selecting "Connection Mode".  A dialog box will appear prompting you to select how you want to connect to the weighing scale.


Now you're ready to receive weight from the scale.  Connect the cables:

1.  Connect the null modem to the scale's RS232 port.
2.  Connect the RS232 to USB cable to the modem.
3.  Connect the USB OTG to the RS232 to USB cable.
4.  Finally, connect the USB OTG to the phone.
5.  Press "Connect" (the upload button beside the menu icon's 3 vertical dots).  The app is now connected to the scale.

or

You may also connect via Bluetooth by:

1.  Pair the bluetooth device in the device's bluetooth settings.
2.  Press "Connect" (the upload button beside the menu icon's 3 vertical dots).
3.  Choose the bluetooth device (in our case it's an RS232 to bluetooth dongle).
4.  A message will appear that the connection is successful.

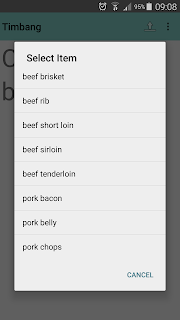
Choose the supplier.  You may do this my tapping on the supplier name.  A generic "Select Item" dialog box appears where you can select the supplier from a list.  You may do the same when choosing the item.
 

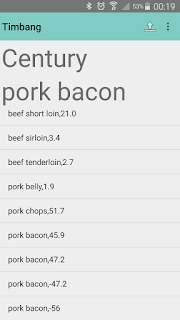
Put in the item to be weighed, and wait until the weight stabilizes, then press the "Print M+" button on the scale.  The item name along with its weight appears on the app's main screen.


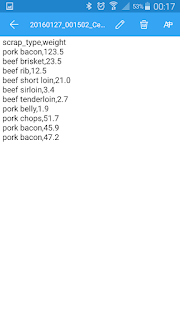
The item, and weight is also recorded in a CSV file named after the time "Print M+" is first pressed, and the supplier's name.

yyyymmdd_hhmmss_<supplier_name>.csv

This CSV file is located at 1_weightrecorder.


If you need to delete the item, long press the item entry for the context menu to appear.  Select "Delete", and the item will be removed from the main screen, as well as from the CSV file.


Sometimes, you have to return items back to suppliers, and thus the weight should be negative.  You may do this by choosing "Set to Backload" in the menu.  Notice that pork bacon's weight is negative.


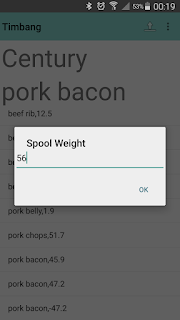
In our line of business, which is recycling of plastic, suppliers bring neat rolls of plastic.  Since we only accept plastic, we deduct the weight of the spools these rolls, much like the core of a toilet paper.  However, we don't necessarily weigh them one by one.  To deduct the weigh of the core, choose "Tare Spool" from the main menu, and a dialog box asking for the spool weight appears.  Input the weight, and this comes out as a deductible weight.


After the weighing session is through, select "Close Connection" from the main menu to terminate the connection between the app, and the weighing scale.

As for the weighing scale, the FIO3 indicator's serial port setting (F16), should be set as such:
BAUD:  9600
PARITY:  none
BITS:  8
AC:  off
CH:  off
ST:  yes
FR:  20d
LAB:  2
COPY:  1

The serial bluetooth dongle should be set to DCE (IF).

Automated Weight Recording: Timbang

Being involved in recycling, we receive scrap frequently.  Suppliers bring scrap in the plant aboard their own trucks, the largest of which is a 6 wheeler.  Scrap are usually packaged in bales for ease in stacking inside the vans.  Another advantage of packaging in bales is that it is makes weighing faster on our pallet scale, since more than one bale can be stacked vertically on the scale's platform.  However, not all suppliers neatly organise their scrap in bales.  Weights were recorded by the receiver in a materials receiving report, which was where we write the type of scrap, and its corresponding weight.  We do this until all the contents of the supplier's truck has been weighed.  After finishing the truck's entire contents, this report was brought to the office, where the handwritten report was encoded, weights summed, and payment issued to the supplier per kilo of scrap.

Unloading time depends on how much the supplier brought, so it's variable.  Recording weights was quite fast, since all the receiver needed to do was to write down the correct weight under the proper scrap category.  The real latency occurred at the office.  Since the report was handwritten, it needed to be encoded in a spreadsheet.  If the supplier brought the scrap in bales, only a few weights would be recorded.  The weights would be few, but big in value.  But if the supplier is not organised this way, there would be many weights in the report, since loose scrap cannot be weighed all at once.  Weight records of loose scrap tend to be many, and small in value.  For example, say the total contents of a supplier's truck is 100 kg.  If it's organised in bales of 50 kg. each, then the report will only have 2 weights needed to be encoded.  But if the supplier did not organise the contents, so they're loose, only a few kilos can be weighed at a time, because the mound of scrap would cave.  Let's say each weighing is around 5 kg., that would be 20 weights that need to be encoded.  And that takes time.

Another problem we encountered with the handwritten method is unpredictable handwriting.  We have 3 receivers, who each has his own handwriting quirks the encoder has to decipher.  There were times a four at the report got encoded as a nine.  That situation would not be in favor for us, since we would have to pay the supplier more than what we got.  The opposite can also happen leaving the supplier shortchanged.  One thing is definite though: we want the correct weights to be recorded for us to have a clean, honest transaction.  In this way, we don't lose money, and the supplier would continue supplying.  There were more things that could go wrong in the handwritten method we used before such as misread weighs, encoding keystroke errors, etc., so a better, and faster method was needed.
The solution adopted by the company was to employ an automated, mobile approach in recording weights.  Luckily, the platform scale in service was using First Philippine Scale's FI03, which features an RS232 connection for printing.  This interface provided flexibility in connecting peripherals, such as a mobile phone running Android OS.  The challenge was that additional hardware was required.  An RS232 to USB converter cable was needed to connect the weighing scale to the phone.  However, having the cable alone is not enough.  Since the cable cannot directly connect to the weighing scale, and to the phone, some converters were required, with one being sourced from the US.  When the hardware part was complete, the next challenge was to develop an Android app to read weight data sent by the scale to be used in recording.  It was also realised later on that not all Android phones support USB Host API feature, which enables a phone to communicate with peripherals connected through its micro USB port.

After the challenges were hurdled, the app was deployed to the receivers.  Scrap is still placed on the platform scale, but no writing on paper is involved.  After the connection has been set up, the receiver only has to press a button on the weighing scale, and the weight data is transmitted to the phone, then this is recorded in a CSV file.  When unloading is done, the receiver uploads the file to a cloud storage  where it is retrieved by the purchasing staff.  Since it's a CSV file, it can be opened through a spreadsheet, where payment calculations are made depending on the types of scrap that was brought.  Tedious encoding is eliminated, along with its associated risks.  However, opening the CSV file, and summing weights for different scrap types (e.g. probably by alphabetizing the scrap types, removing duplicates, then using a conditional summing function), recording for inventory (e.g. copy and paste), and finally, printing a report seemed too tedious even when scrap receiving has been automated.

Summing weights, recording for inventory, and printing a report was mechanical task that took the time of our purchaser, which can be used for some other valuable task (i.e. looking for cheap suppliers).  It was in fact too mechanical, that I thought of having the computer do it instead of our purchaser.  Spreadsheets have a feature that can be used to automate tasks.  In this case, the task was to:

1.  Open the CSV file.
2.  Determine the scrap types delivered.
3.  Once unique scrap types have been determined, sum the weights of each scrap type.
4.  Record the scrap receiving in the inventory.
5.  Check the price per kilo of each scrap type received, and calculate payment.
6.  Print a report.

These are now all done by a small program in the spreadsheet.  Now, once the receiver uploads the CSV file of the scraps received, it only takes a press of a button to run the small program that does everything.  Time is conserved, and the purchasing staff is left to do more value added tasks.

Efficiency has its price.  Disregarding the price of the weighing scale, which we already had, we had to purchase a second hand, but high end phone that supports USB Host API, the cable, and adapters.  The cost was around P7000+ to automate the process, bulk of which went to the price of the phone.  It was only later on that a cheaper alternative was suggested in Google Developers Group Hackfair 2015.  Interestingly, a wireless solution is a cheaper approach.  I was able to source an RS232 to bluetooth dongle, which is relatively cheap compared to the price of buying a high end phone.  And after some development, bluetooth communication is now supported by the app.

Get it on Google Play